 Ryan Harvey
Updated:
Ryan Harvey
Updated:
Overview
Managing your safety program often means keeping an eye on certain Key Performance Indicators (KPIs) and goals you've set for your company. Pulse will monitor these numbers on your behalf and will automatically let you know when they go above or below a specified threshold, freeing you up to focus on the rest of your work.
How Often Does Pulse Check Your Data?
Pulse checks your data every time you refresh your screen or roughly every hour, whatever occurs first.
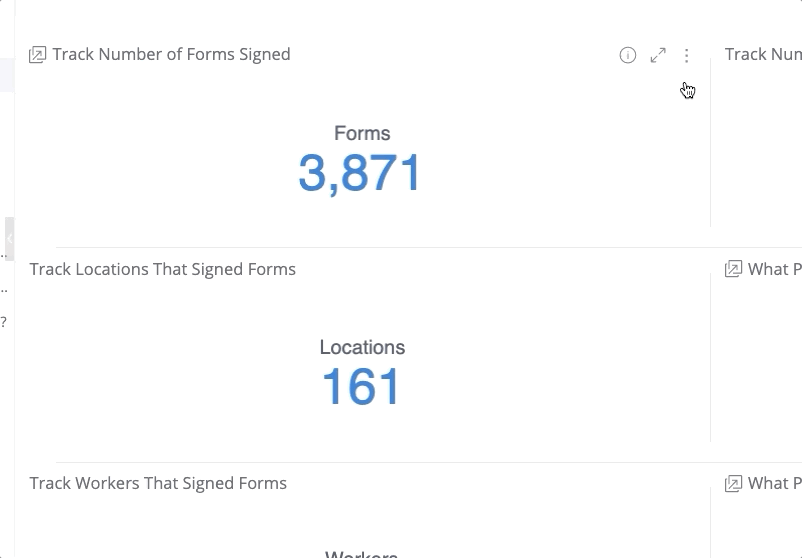
You can create Pulse items from any Dashboard, which gives you endless options for keeping track of important data that is meeting, or failing to meet, your defined goals.
Adding a Pulse Item
Your Pulse items will be based on the data you've filtered for in your Dashboard. Once you're satisfied that your filters are accurate, click the Ellipsis Icon ( ) on the appropriate widget and choose "Add to Pulse".
(For a refresher on how to work with Filters on your Dashboards, click here).
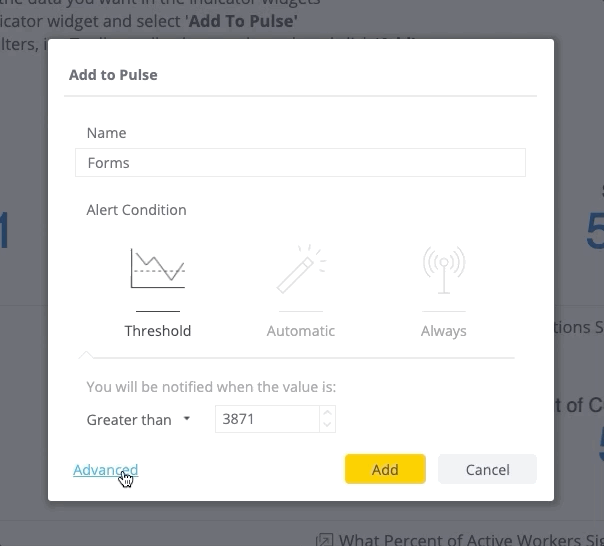
Then, you'll want to define the 'when', 'how', and 'who' for your Pulse item before clicking "Add."
Choosing an Alert Condition
The alert condition dictates when and/or why the system will register that your Pulse item should trigger an alert.
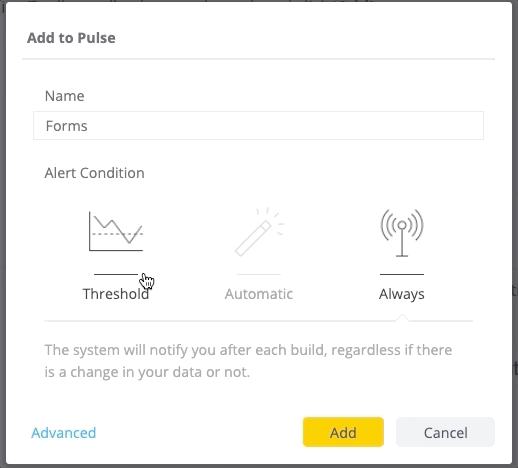
Threshold
Your Pulse item will be triggered based on the data's relationship to a threshold you have defined. For example, you may have set a goal for your workers to have signed 5 FLHAs this week. Pulse could alert you once they reach this goal.
The threshold alert condition is the most commonly-used.
Automatic
Pulse will use Artificial Intelligence (AI) to automatically monitor your data pattern. As it detects anomalies, it will email you with helpful alerts.
Always
Pulse will send the alert every time the data refreshes (in this case, about once an hour). Since this option sends alerts regardless of whether or not the data has changed, most companies will find this level of communication to be too frequent.
While we don't expect many customers to use this alert condition, it may be helpful in some specific, unique circumstances.
Advanced Settings
From the Pulse pop-up window, you can click the "Advanced" button to further customize your Pulse item. This is where you will add additional recipients for this Pulse alert and customize the email message to be sent.
Additional Options
On the Notification Settings tab, click on "Additional Options." Here you are able to turn additional settings on/off.
Selecting the "Notify only once after a condition is met" will prevent you from continuing to receive alerts once your KPI or safety goal has been achieved (for example, if your goal is to have 100 safety forms completed in a month, you'll get an email once that goal is hit. You probably don't need another email the next day that you are still above 100 forms).
Selecting the "Notify when a condition is no longer met" option will mean that Pulse will let you know if a KPI or safety goal dips back below the threshold again.
Turning both of these options on will keep you well-informed without too many emails landing in your inbox.
How Does Pulse Give You Alerts?
- Primary
- Email with link to widget and a user-generated message
- Secondary
- Mobile App (not text and currently not available)
- Slack (requires self-serve IT configuration with webhooks)
- Zapier (requires self-serve IT configuration with webhooks)
Accessing Your Pulse Items
You can access your existing Pulse items at any time by clicking on the Pulse menu at the top of your screen. Here you can edit, duplicate, turn off, or delete individual items, as well as view a history of each Pulse to see how it has been trending over time.
Comments